# Project Setup for VR/XR

{% tabs %}
{% tab title="Tutorial" %}

## Quest Link Setup

Before being able to test passthrough in Unity using Quest Link (rather than using a cable) you need to enable it in the Oculus Desktop App.&#x20;

The headset will not display the passthrough environment on the headset if you do not do this.

<figure><img src="https://1511627699-files.gitbook.io/~/files/v0/b/gitbook-x-prod.appspot.com/o/spaces%2FwBY0yo2lTxFMvwpoAeN8%2Fuploads%2FhABo4oP9l8UNCsrpo1ig%2FEnableQuestLink.gif?alt=media&#x26;token=ba121e87-18dd-4058-a3f8-6939c7d3b364" alt=""><figcaption><p>Enable Quest Link in Developer Runtime Features...</p></figcaption></figure>

* Go to the Oculus Desktop App (v37.0 or later).
* Go to the Settings > Beta section.
* Enable 'Developer Runtime features'.
* Enable 'Passthrough over Meta Quest Link'.

You will need to restart Unity if you do this *after* creating the Unity Project in order for it to work correctly.

## Meta XR Configuration

<figure><img src="https://1511627699-files.gitbook.io/~/files/v0/b/gitbook-x-prod.appspot.com/o/spaces%2FwBY0yo2lTxFMvwpoAeN8%2Fuploads%2FxklO5H3TO6En6q5ls637%2FApplyAndFixAll.gif?alt=media&#x26;token=6357ec26-ae8e-4a5a-b782-8f05874a7159" alt=""><figcaption><p>'Apply All' and 'Fix All' issues within 'Project Settings / Meta XR'...</p></figcaption></figure>

* Go to the 'Edit Menu / Project Settings / Meta XR' category.
  * You can also open this at the bottom right of the Unity Window with the Meta Logo.
* Make sure to 'Fix All' and 'Apply All' to both Desktop and Android categories in order to make sure the Project Environment is set up correctly.
* Depending on the situation you may need to work through custom Errors and/or Warnings. Check Troubleshooting Tab above for more information.&#x20;

## Setting Up the Camera

If you are wanting to set up a VR environment, all you need to do is add the OVRCameraRig asset.

<figure><img src="https://1511627699-files.gitbook.io/~/files/v0/b/gitbook-x-prod.appspot.com/o/spaces%2FwBY0yo2lTxFMvwpoAeN8%2Fuploads%2FVlbm0N7KXO04BaBIZMwI%2FAddOVRCamera.gif?alt=media&#x26;token=348eea78-c62a-414c-978b-46a1d05aba47" alt=""><figcaption><p>Add an OVRCameraRig or OVRCameraRigInteraction prefab...</p></figcaption></figure>

* Delete the 'MainCamera' in the Project window.
* Go to the Project window and search for 'OVRCameraRigInteraction' for a more complete setup (such as hands etc).
  * You may need to set the 'Search' pulldown at the top Left of the Project window to 'All' or 'In Packages'.
  * Use the Slider at bottom left of the Project Window to adjust asset view to List.
  * You can search for 'OVRCameraRig' for a more basic Camera setup if you like.&#x20;

<figure><img src="https://1511627699-files.gitbook.io/~/files/v0/b/gitbook-x-prod.appspot.com/o/spaces%2FwBY0yo2lTxFMvwpoAeN8%2Fuploads%2FvdFqanlPKZjRuAlB5B7L%2Fimage.png?alt=media&#x26;token=73f90758-85a3-4283-be14-2b783bf091f8" alt=""><figcaption><p>
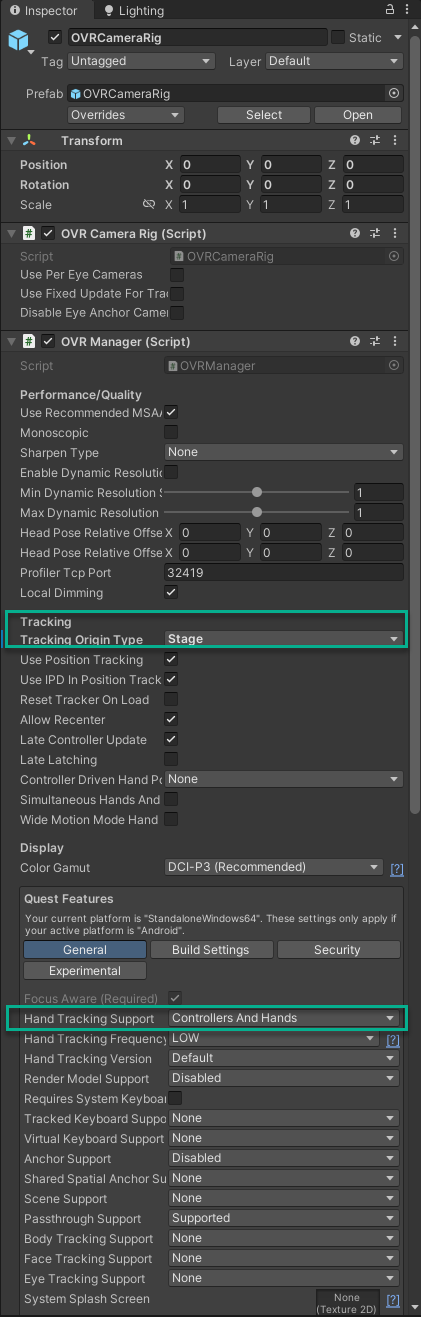
Modify settings in the OVRCameraRig asset...</p></figcaption></figure>

* Once added, go to the 'OVRCameraRig' asset and modify settings as needed.
  * This may be a child of the 'OVRCameraRigInteraction' asset.
  * Set the Tracking Origin type to 'Stage' if you want the camera to be based on the real world floor position.
  * Adjust the 'Hand Tracking Support' to your desired input type :&#x20;
    * Controllers Only
    * Controllers and Hands
    * Hands Only

<figure><img src="https://1511627699-files.gitbook.io/~/files/v0/b/gitbook-x-prod.appspot.com/o/spaces%2FwBY0yo2lTxFMvwpoAeN8%2Fuploads%2FwdiS7AFnqSX21DEjiZUc%2FAddDesk.gif?alt=media&#x26;token=c2642e2c-5585-4ec2-a571-21f18b8bd4d4" alt=""><figcaption><p>Add a simple desk for reference...</p></figcaption></figure>

* Place an object, such as a cube, in your space for reference.
  * Note the default cube is 1m x 1m x 1m, so adjust accordingly.
* Make sure the Oculus Desktop App is running, and your Quest is connected via Cable or through Quest Link.
* If you can see the Meta Desktop Environment on your headset, you can hit 'Play' in Unity and it should load the environment into the headset.

## Adding Passthrough

If you are wanting to add XR Passthrough effect to your experience, where the headset can see through the headset cameras to the real world, you will need to add some further elements covered in the next tutorial at [project-setup-for-xr](https://themattempire.gitbook.io/documentation/archive/unity/vr-xr/project-setup-for-xr "mention").&#x20;

If you just want a VR experience, you can skip ahead to [movement-teleportation](https://themattempire.gitbook.io/documentation/archive/unity/vr-xr/movement-teleportation "mention").&#x20;
{% endtab %}

{% tab title="Troubleshooting" %}

### Passthrough doesn't work!

If you are using the Quest Link to test your project, make sure that you have enabled with the following :&#x20;

* Go to the Oculus Desktop App (v37.0 or later).
* Go to the Settings > Beta section.
* Enable 'Developer Runtime features'.
* Enable 'Passthrough over Meta Quest Link'.

### Passthrough Issues

#### Passthrough doesn't work at all

* Select the OVRCameraRig.
  * This may be a child of the 'OVRCameraRigInteraction' asset.
  * Set 'Passthrough Support' to 'Supported' or 'Required' under the General tab.
  * Enable 'Enable Passthrough' under 'Insight Passthrough'.
  * Add a 'PassthroughOVRLayer' component to the OVRCameraRig asset.
    * Set the Placement to 'Underlay' if you want the passthrough to be behind everything.
    * Set the Composition Depth to 1.

#### Passthrough shows a Blue Environment

* Select the 'CenterEyeAnchor' asset under 'CameraOVRRig / TrackingSpace'.
  * Set the Background color to Black with Alpha at 0.

#### Passthrough shows the Default Skybox

* Select the 'Lighting Window / Environment'.
  * Set the 'Skybox' to 'None'.

### Camera Issues

#### The experience is black...

Make sure to enable the OVRCameraRig or OVRCameraRigInteraction assets if you disable them while building the experience.&#x20;

### Meta XR Errors / Warnings

#### 'The Oculus Integration Package (v63) and Meta Simulator Package (v62) must match to ensure correct functionality'

This issue may not break your experience. This is due to error differences in the packages that Meta will no doubt align at some point. You may want to try and find the previous versions of the All-in-one SDK, or wait until the Simulator package gets updated.&#x20;
{% endtab %}
{% endtabs %}
